Deeper Thinking and Revised DOK Flowchart
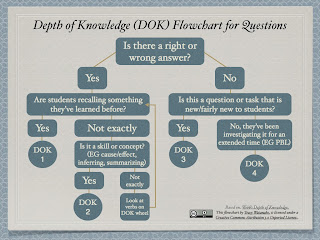
About a year or two ago, I noticed my DOK Flowchart floating around Pinterest . I didn't think much of it because the thought process behind the flowchart was documented on my post titled, Striving for Higher-Order Thinking and Depth of Knowledge . This flowchart was created to help teachers in my former district categorize their own questions by DOK level, to look for patterns and trends, in order to set goals regarding their quest for deeper thinking. It was a flowchart that worked with many question patterns we commonly saw, but was not intended to be definitive. For example, when it came to a question in math, we knew there was a right and wrong answer -- for example, 3X4=12. However, we considered how there were multiple approaches to get to that correct answer. While, that was a discussion we had face-to-face, my original flowchart did not reflect those conversations. Therefore, I revised the flowchart to help clarify: Click here to download as PDF. Below are